
Emergency Solar Radio in Altoids Tin

STEP 1: Gather Materials
I bought all the supplies I needed from my local $1 Store. (If in Japan, a 100 Yen store.)
To buy:
1x FM Radio
2x Solar Garden Light
1x Diode ($1 for 100 of them online, or take one out of any random junk pile)
If your local $1 Store isn't as cool as mine, you can probably find these things locally, online (like at my website BrownDogGadgets.com), or from a trash bin.
Tools:
Soldering Iron
Drill
Wire
Wire Strippers
Goggles
Tape

Optional:
Altoids Tin
Hot Glue
Mini Speakers ($1 Store, or take apart old headphones)

Support Me By Buying Some Parts...
If you can't find solar cells or cheap AAA batteries, I have quite a few on my website BrownDogGadgets.com. The same solar cells I use to make my Solar Cockroach would work great for this project. You could also slap on a bigger, more powerful cell onto the outside of the tin like these nice 4.5 volt cells.
I also some AAA battery holders and very cheap AAA batteries for sale that have a much higher capacity than the ones you'd find in your average solar light.
STEP 2: Salvage the Solar Lights
God bless the $1 Store and it's amazing Chinese junk. I found my local store selling these cheap plastic solar lights, and I ended up buying all of them. Why ask you would I spend $120 at the $1 Store?
Inside each of these lights is one 3.5 volt Solar Cell, one AAA NiMh battery, one LED, one transistor, and one resistor. That is honestly worth more than $1 when making projects. Plus I can always make runway light patterns across my backyard and see if anyone will try and land there.
If you can't find these solar lights, you can find them in bulk on ebay. You can also just use a couple of regular NiMh AAA batteries and any old solar cell 4 volts or above, but it will cost you a little bit more than $3.
Take apart the head of the solar light. Be careful to remove the little circuit board for future use.
Snip the wires going to the solar panel. Depending on your solar light you can either pry it out with a screw driver or push it from behind. I used a nail to push from the underside. The glue they use isn't very strong and the solar cell is quite sturdy.
The only danger is that you break off the little solder point on the solar cell. If you do this just throw it away and take apart another solar light.
After doing this to both lights you'll now have two solar cells and two AAA batteries.


 STEP 3: Test Your Radio
Seriously, test your radio out ahead of time. Better you see if it's working now than after you take it apart.
You can also test out your AAA batteries to see if they're working and if they'll play nice with your radio.
Now you may notice those little white speakers, also from the dollar store. They suck more than the cold vacuum of space. I ended up not using them with this project and instead used them to entertain my cat.

STEP 4: Take Apart Your Radio
This part can be tricky depending on your radio. This is how I took apart mine.
I first unscrewed the back.
After that the only thing holding in the board was the volume nob. If you're lucky the top of your knob will come off (no pun intended). If you look at my board you'll see the "buttons" on my radio are nothing more than some common momentary switches. I even have a little LED there as well. Bonus!
Now the volume nob on my radio would not come off, so I took a different approach. Using some tin snipers I cut apart the plastic of case until everything was free. Then I used some little wire clippers and cut the remaining bits away from the nob area. You should wear eye protection during this part as plastic was flying everywhere.
You'll notice that I saved the "Battery Holder" area. Do this is you can. You can just buy a AAA holder for $1, but we're on the cheap here people!
In the end you should have, if nothing else, your radio's circuit board out, and if you're lucky you'll have a battery holder as well.


STEP 5: See If It Fits and Works
My personal favorite case of choice is an old Altoids Tin. No matter what you're using to hold the project in, now is a good time to see if everything fits and that it still works fine.
Mine fit perfectly into the tin case. After hooking up some headphones everything seemed to work fine, including the LED.
This is also a good time to design your internal layout and decide if you have enough room to put the solar cells on the inside or not.


STEP 6: To Speaker or Not To Speaker?
My original plans were to solder in a little toggle switch and some speakers. This way the user could choose between using the internal speakers or external headphones. This didn't work.
For one the little speakers I got from the $1 store sucked, hard. The FM radio didn't have enough power to get much sound out of them, then again neither did my iPod. This would be a really awesome thing to work it in there, maybe by finding some powerful little headphones or one really powerful little speaker. If you can't, I honestly would worry about it.
(Yes, I tried them out before removing their protective cases. It didn't make a difference. Thats $1 I'll never see again.

STEP 7: Drill Baby Drill
So instead of doing internal speakers I just made a hole for the headphone jack.
To do this I first lined up everything inside, then marked where I wanted to drill on the outside.
Drilling Altoids tins is easy. Just be careful. Get a good RPM going, press some, and make sure your fingers are safe. You may want to file the inside of your tin if you've got lots of metal bits poking things. (I didn't, but you never know.)
It also doesn't hurt to have a backup tin around. Just in case.
Make sure your headphone jack goes all the way into the drilled hole! If nothing else test that your headphone will in fact work with how you've got it set up!

STEP 8: Wire Up the Cells
If you have a multi-meter test your solar cells out. The ones I used each put out between 3.3 - 3.5 volts.
These cells are great for charging up a single AAA battery of 1.2 volts, but now we're using two AAA batteries in a series for a total of 2.4 volts. Seeing as how the goal of this is to be an emergency radio and be able to charge up even in bad weather we should boost the voltage on our solar cells. (Or you can use any solar cell or group of cells that put out more than 4 volts that you have around.)
To do this we'll be connecting our cells in a series, which means the amps will stay the same but our voltage will double.
First, solder a long wire onto the diode end with the black strip. Then solder the other end of the diode to the positive tab of one of your solar cells.
Solder a long wire onto the negative tab of the OTHER solar cell.
Each cell should have one wire now. One positive (with a diode) and one negative.
Now connect the two cells using the two remaining soldering points, AKA bridge the remaining positive and negative solder points. I just used a bit of scrap wire, anything will do.
When you're finished use some tape to hold down the wires and to protect the solder points.
If you're at all confused just look at the pictures below.


STEP 9: Wire Up the Cells and Battery Pack
Now wire the positive and negative wires from the cells into your circuit.
You can either wire them directly to the board or to the battery pack. I choose to wire them directly to the battery pack area.
Positive to the positive tab, negative to the negative tab.
Sorry for the blurry photo, I didn't notice that until I starting writing.

STEP 10: Tape It Up
Once again, test it to see if it works. Use a multi-meter to see if power is flowing properly, or just put it in some sunlight and turn the radio on. Depending on how many amps your cells put out the radio should work, though if they're super cheap they might fall flat on directly powering your radio. Thats ok, thats why we have batteries.
I used some double sided foam tape to secure everything inside. It keeps the circuit board from touching the metal tin area. If you're worried about shorts just put some electrical tape on the bottom of the tin.
Just be sure to line up your headphone jack and that inserting headphones doesn't unstick your circuit board.
Hot glue also works just fine.

STEP 11: Finished!
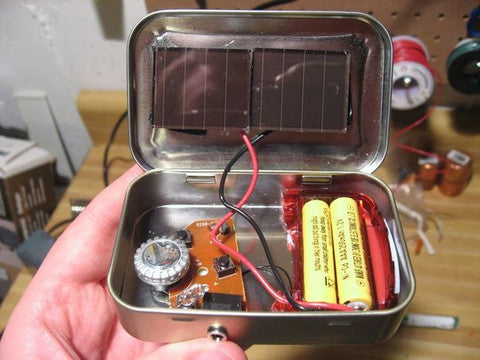
Everything fits into the Altoids tin and it easily shuts. Now I have a little radio that's solar charged and has a little LED. That wasn't so bad. It even gets a signal through the Altoids tin.
Plus in a pinch you can swap out the AAA batteries for regular ones OR use the solar cells to charge up other dead NiMh AAA Batteries you have.
Other Ideas that would be easy to do if you're willing to put in the time and parts.
1) Use a rechargeable 3V coin cell or ultra capacitor to save space.
2) Put solar cells on the outside, and speakers inside.
3) Work in some retractable headphones or some speakers.
4) Drill a hole for the LED to stick out the front and also have a button on the outside to work the LED. (if your radio has an LED like mine does. Or heck, wire in your own LED into the circuit.)
Support Me By Buying Some Parts...
If you can't find solar cells or cheap AAA batteries, I have quite a few on my website BrownDogGadgets.com. The same solar cells I use to make my Solar Cockroach would work great for this project. You could also slap on a bigger, more powerful cell onto the outside of the tin.
I also some AAA battery holders and very cheap AAA batteries for sale that have a much higher capacity than the ones you'd find in your average solar light.
I also have a wide range fun fun little kits you can put together if you need a little weekend project.


STEP 12: Version 2.0
So I gave building one of these a second try and it worked out a bit better. This version is just like the old version, except on steroids and a bit more expensive.
I used another $1 Store Radio as well as managed to fit in some $1 headphones. Instead of using the $1 Store solar lights I instead used three 1.5 volt 50 ma solar cells which are smaller and more powerful. I also used some higher capacity AAA batteries I had.
The total cost of this one is about $6-7. Twice as much as the original one, but still much cheaper than buying a store bought solar radio and far more cute in this Altoids Tin.
Oddly enough, I now have a complete solar Altoids kit setup in my room. Solar Radio, Solar Flashlight, Solar USB Charger... In the event of a massive power outage (or zombie invasion) I think I'm set.
