

Altoids Smalls LED Flashlight
STEP 1: Gather Materials
Hardware
Soldering Iron
Drill with 9/11 inch bit
Wire Cutter

Parts
Altoids Smalls tin ($1-1.50)
Electrical Tape
Wire (any type will do, I used magnet wire because I had some)
Coin Battery Holder ($.75)
Coin Battery (10 pack for $3)
Two 3mm White LEDs (100 for $8 off ebay)
Two 3mm LED holders (30 for $2 off ebay)
Two resisters of value less than 100 ohms (100 for $2 off ebay)
One Submini Momentary Pushbutton switch... or toggle! (2 for $2.50 at Radio Shack)

The only thing I didn't have at my "shop" were the pushbutton switches. I had to bite the bullet and buy them from Radio Shack. They're the "submini" type, which means very small.
Everything else I had bought in bulk, so the total cost of the parts used was quite small. Buy a bunch of LEDs and LED holders off ebay. They'll cost you a little bit and last for many a project.
STEP 2: Minty Fresh Breath
If you have a tin, awesome. If not, buy one.
Or...
If you're giving this as a gift (great idea) you can put the mints in a bag to give along with the flashlight.

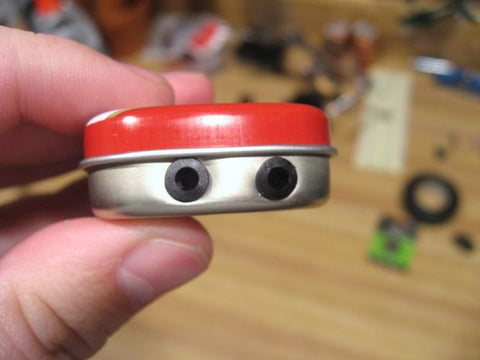
STEP 3: Drill Baby Drill
A 9/11ths sized drill bit works perfectly for every hole in this project.
When drilling make sure you keep the lid shut, and that you try and space things out ahead of time. Put the drill a more than halfway below the lid and the bottom lip. (And unlike me you may want to mark where you want each hole so they're evenly spaced....)
Push your drill into the tin a bit to leave a dent. Then apply pressure while drilling. You don't have to go crazy pushing down. The tin, while quite strong, is easy to drill through with even just wood drill bits. (Which I use)
After you drill both holes, pop in the LED holders to make sure they fit. Maybe even pop an LED in each just to double check that they fit.

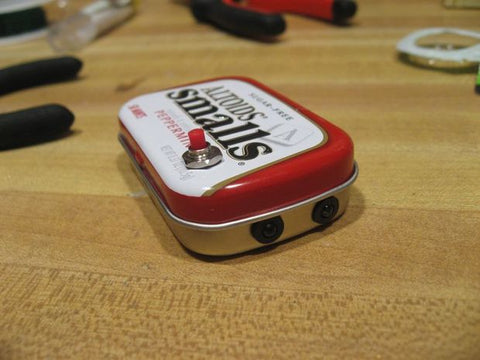
STEP 4: Button Hole
The best place, in my opinion, is below the S in "smalls." You could put the push button on the lip of the bottom, but it'd be a tough fit. Also, I think having the button there works better when holding the darn thing.
Again, lid shut. Push to make a dent. Apply pressure when drilling.
Pop the button in when you're finished! It's a tight squeeze for the button, but it'll fit.
(So 9/11ths mostly works for this hole. If you can't get the button in use the 9/11ths drill to make it a bit bigger. Put the bit into the hole, run the drill, and apply pressure to the edges. This will make it a tad bigger.)


STEP 5: Tape Up the Bottom
To reduce the chance that we get a short, and to make things appear classy, use some electrical tape and line the bottom of the tin.

STEP 6: Wire and Solder LEDs
Before someone comments, no, you don't really need the resistors because we're working with a battery that is only 3 volts. BUT having some resistors will increase the life of the LED's and provides some protection. I used 100 ohm resistors because I have heaps. Anything less than 100 will be fine.
Twist a resistor around the positive (long leg) of each LED.
Then twist the other ends of the resistors together.
Twist those around the positive tab of the battery holder.
Solder.
(Don't do anything to the negative legs yet!)


STEP 7: Wire the Switch
Carefully bend the two legs of the switch down a bit. Seriously, be careful or you'll have to go back to Radio Shack and blow all your money. Again.
Take some wire and wrap it around one leg.
Solder.
Wrap the other end of the wire around the negative side of the battery case.
Solder.
At this point you should pop the LEDs into the LED holders and have the two negative legs touching each other.
Take another bit of wire and wrap it around the two negative legs of the LEDs.
Solder.
Wrap the other end around the second switch tab.
What do we do next?
Solder.


STEP 8: Test and More Tape
At this point you can test to see if everything is working.
Well, is it?
Before we close up you need to put a bit of tape down again. Put a layer of tape between the resistors/ positive legs and the negative legs. This prevents any shorts from happening when you close the lid.

STEP 9: Enjoy!
Well close her up. We're done. Make sure you don't have any shorts (you shouldn't if you used tape!) and that your button is screwed in tight.
See, that wasn't so bad. Plus it looks really classy both inside and out. These really impress people as gifts, and really don't cost very much if you order some of the parts in bulk ahead of time. (AKA avoiding Radio Shack....)
This is a project that is great for beginners and kids, and teaches a lot of electrical basics in the process. Plus you get to munch on mints while making it.
Now if you'd like to own one but really couldn't be bothered to make one on your own.... I do happen to have many a flavor of tin available at my gadget site BrownDogGadgets.com. Or, if you prefer, my etsy.com account.

Here is a PDF with more pictures on how to make this Better Altoids Smalls LED Flashlight: A-Better-Altoids-Smalls-LED-Flashlight.pdf